
- Introduction and Application Architecture
- Setting up the React Application
- Setting up the Spring WebApplication
- Setting up the Python Application
- Container-ization of the Services
- Container-ization of everything else
- Introduction to Kubernetes
- Kubernetes in Practice – Pods
- Kubernetes in Practice – Services
- Kubernetes in Practice – Deployments
- Kubernetes and everything else in Practice
- Kubernetes Volumes – in Practice
In the last article Kubernetes in Practice – Pods, we started two pods (sa-frontend and sa-frontend2) and we were left with two requirements, which will be the topic of this article:
- Exposing the services (running in the pods) externally, and
- Load balancing between them.

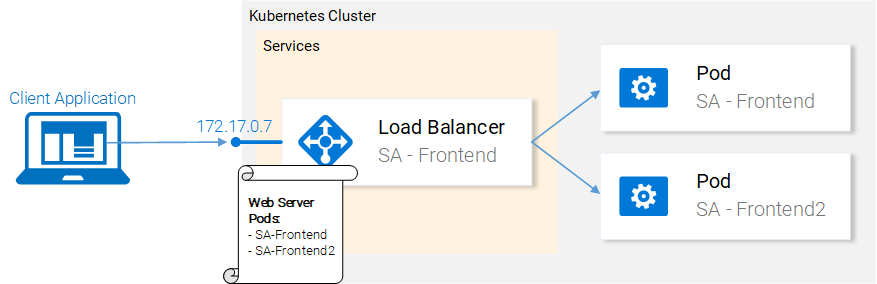
The Kubernetes Service resource acts as the entry point to a set of pods that provide the same functional service.
Put simply, instead of our client applications maintaining lists of IP addresses for all the different pods (see example in figure 1), Kubernetes provides the resource Service that does the heavy lifting, by discovering the services and load balancing between them as shown in figure 2.
In our Kubernetes cluster, we will have pods with different functional services (the frontend, the Spring WebApp and the Flask Python application). So the question arises how does a service know which pods to target? I.e. how does it generate the list of the endpoints for the pods?
This is done using Labels, and it is a two-step process:
- Applying a label to all the pods that we want our Service to target and
- Applying a “selector” to our service so that it knows which labeled pods to target.
This is much simpler understood visually, so check out figure 3.
Labels

Labels provide a simple method for organizing your Kubernetes Resources.They represent a key-value pair and can be applied to every resource. Before getting started with the service you need to modify the manifests for the pods to match the example shown in figure 3.
After completing the changes save the files, and apply them with the following command:
$ kubectl apply -f sa-frontend-pod.yaml
Warning: kubectl apply should be used on resource created by either kubectl create --save-config or kubectl apply
pod "sa-frontend" configured
$ kubectl apply -f sa-frontend-pod2.yaml
Warning: kubectl apply should be used on resource created by either kubectl create --save-config or kubectl apply
pod "sa-frontend2" configured
We got a warning (thanks for the info, we promise we will) and in the second line, we see that the pods “sa-frontend” and “sa-frontend2” were configured. We can verify that the pods were labeled by filtering the pods that we want to display:
$ kubectl get pod -l app=sa-frontend
NAME           READY     STATUS    RESTARTS   AGE
sa-frontend    1/1       Running   0          2h
sa-frontend2   1/1       Running   0          2h
Another way to verify that our pods are labeled is by appending the flag --show-labels to the above command, this will display all the labels for each pod.
Great!v Our pods are labeled and we are ready to target them with our Service, let’s get started!
Service definition
We will jump straight into the YAML definition and as always the explanation for all the points is right below.
- Kind: A service.
- Type: Specification type, we choose LoadBalancer because we want to balance the load between the pods.
- Port: Specifies the port in which the service gets requests.
- Protocol: Defines the communication.
- TargetPort: The port at which incomming requests are forwarded.
- Selector: Object that contains properties for selecting pods.
app: sa-frontendDefines which pods to target, only pods that are labeled with “app: sa-frontend”
To create the service execute the following command:
$ kubectl create -f service-sa-frontend-lb.yaml
service "sa-frontend-lb" created
You can check out the state of the service by executing the following command:
$ kubectl get svc
NAME             TYPE           CLUSTER-IP      EXTERNAL-IP   PORT(S)        AGE
sa-frontend-lb   LoadBalancer   10.101.244.40   <pending>     80:30708/TCP   7m
We can see that the External-IP is in pending state (and don’t wait, as it’s not going to change). This is only because we are using Minikube, if we would have executed this in a cloud provider like Azure or GCP, we would get a Public IP, which makes our services worldwide accessible.
Despite that, Minikube doesn’t let us hanging it provides a useful command for local debugging:
$ minikube service sa-frontend-lb
Opening kubernetes service default/sa-frontend-lb in default browser...
This opens your browser pointing to the services IP. After the Service receives the request, it will forward the call to one of the pods (which one doesn’t matter). This abstraction enables us to see and act with the numerous pods as one unit, using the Service as an entry point.

Summarization
In this article, we learned how to label resources, how to use those as selectors in Services, and how to define and create a LoadBalancer service, this fulfills our requirements, to scale the application (just add new labeled pods) and to Load balance between the pods, using the service as an entry point.
That’s it about Services! We are left with only one thing to wrap our mind around and we are ready to use Kubernetes IRL.
If you enjoyed the article, please share and comment below!